How to receive Contact ID alerts
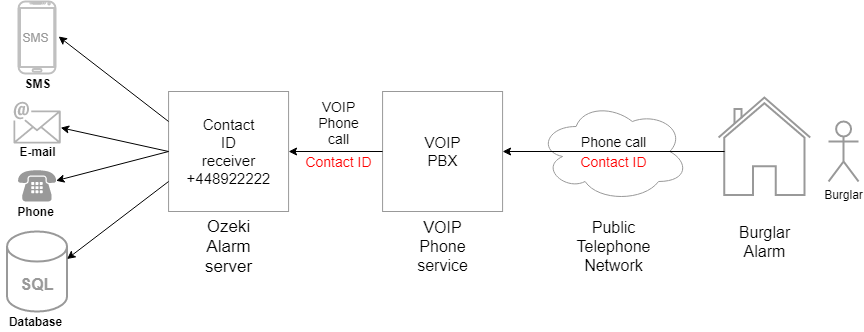
This page gives you information on how to receive Contact ID alerts from alarm systems using phone calls. Your Ozeki Alarm server will connect to a VoIP phone service (or VoIP PBX), to be able to accept phone calls. After this incoming phone calls will be converted into Contact ID alarm messages. You may forward these alarm messages to various destinations, including SMS, E-mail, outgoing Cotnact ID calls, or you may simply save them into a database.
How to forward a contact ID alert to an E-mail address
The first step is to launch the Alarm System application. You can do this by clicking the icon of it on your desktop or search for it in the Ozeki OS. Then, you need to add a new notification source, which will send you the alert in case of a predetermined event. To add the new source, click the Add new source… button located on the right side of the screen. You can see where to click on Figure 2.

Now you need to choose which type of source you wish to install. You can see all your options on Figure 3. The Contact ID receiver can Register to a PBX and receive Contact ID alert throught a phone call. Click the Install button located next to the Contact ID receiver title.

Now you need to name you connection. Make sure to name the connection something that you can distinguish it from other connections. If you look below, you could see the connection configuration panel. Here you need to provide the VOIP/SIP user account details. You can see the settings on Figure 4.

More options are located in the Advanced tab. Here you can setup a Log level. A log is used to track all your communication activities within your server. It is important, because this way you will have a formal recording of all the event occurred on the server. You can see on Figure 5, which boxes to tick in if you wish to log the happenings on your connection.

Now you are finished with setting up the Contact ID receiver. All you need to do now is to turn it on. You can do this with the help of the connection indicator located on the left side of the screen, as you can see on Figure 6. Turn it on and you can see on the Events tab that the connection is live.

Now you need to add a new notification channel, which will notify you in case of a predetermined event. To add the new channel, click the Add new channel… button located on the left side of the screen. You can see where to click on Figure 7.

After it delect the E-mail connections. This will bring up the E-mail connection list.

Select the SMTP client.

SMTP is an internet standard for email transmission. SMTP servers are used for relaying outgoing emails. On the From section provide the default sender address and On the SMTP server section, please enter the SMTP server's IP address or domain and the port number as you can see in the Figure 10. In case your SMTP server requires authentication, provide the username and password. You can also choose SSL connection if your SMTP server has a more secure connection.

Now switch to the Advanced tab (Figure 11) and make sure the emails are sent to the correct address. In the textboxes you can set the default recipient name and address.

You can add a routing rule by clicking Routes button from the Alarm System menu. Then in the Settings, for the From connection, select the Contact ID receiver connection, and for the To connection, select the E-mail connection through which you want to send the alert (Figure 12).

Finally in the Contact ID receiver connection's Event tab you can see that the Contact ID alert message is received and forwarded to the SMTP connection (Figure 13).

In the recipient's inbox you can see the E-mail Alert is received as the Figure 14 is shows.
