How to send a contact ID alert using an HTTP request
This document gives you the messages format to use to send a contact ID alert message. The Contact ID message format is described in the Contact ID protocol description. This document explains how you can adapt this message format to an HTTP request.
Introduction to the Contact ID protocol
There are several protocols used by alarm systems to communicate with central stations. By far the most popular of them is Contact-ID. Here is the official document describing the Contact-ID standard (PDF). Like most standard documents, reading it is quite boring (though I’ve seen worse), so let me shorten the story for you:
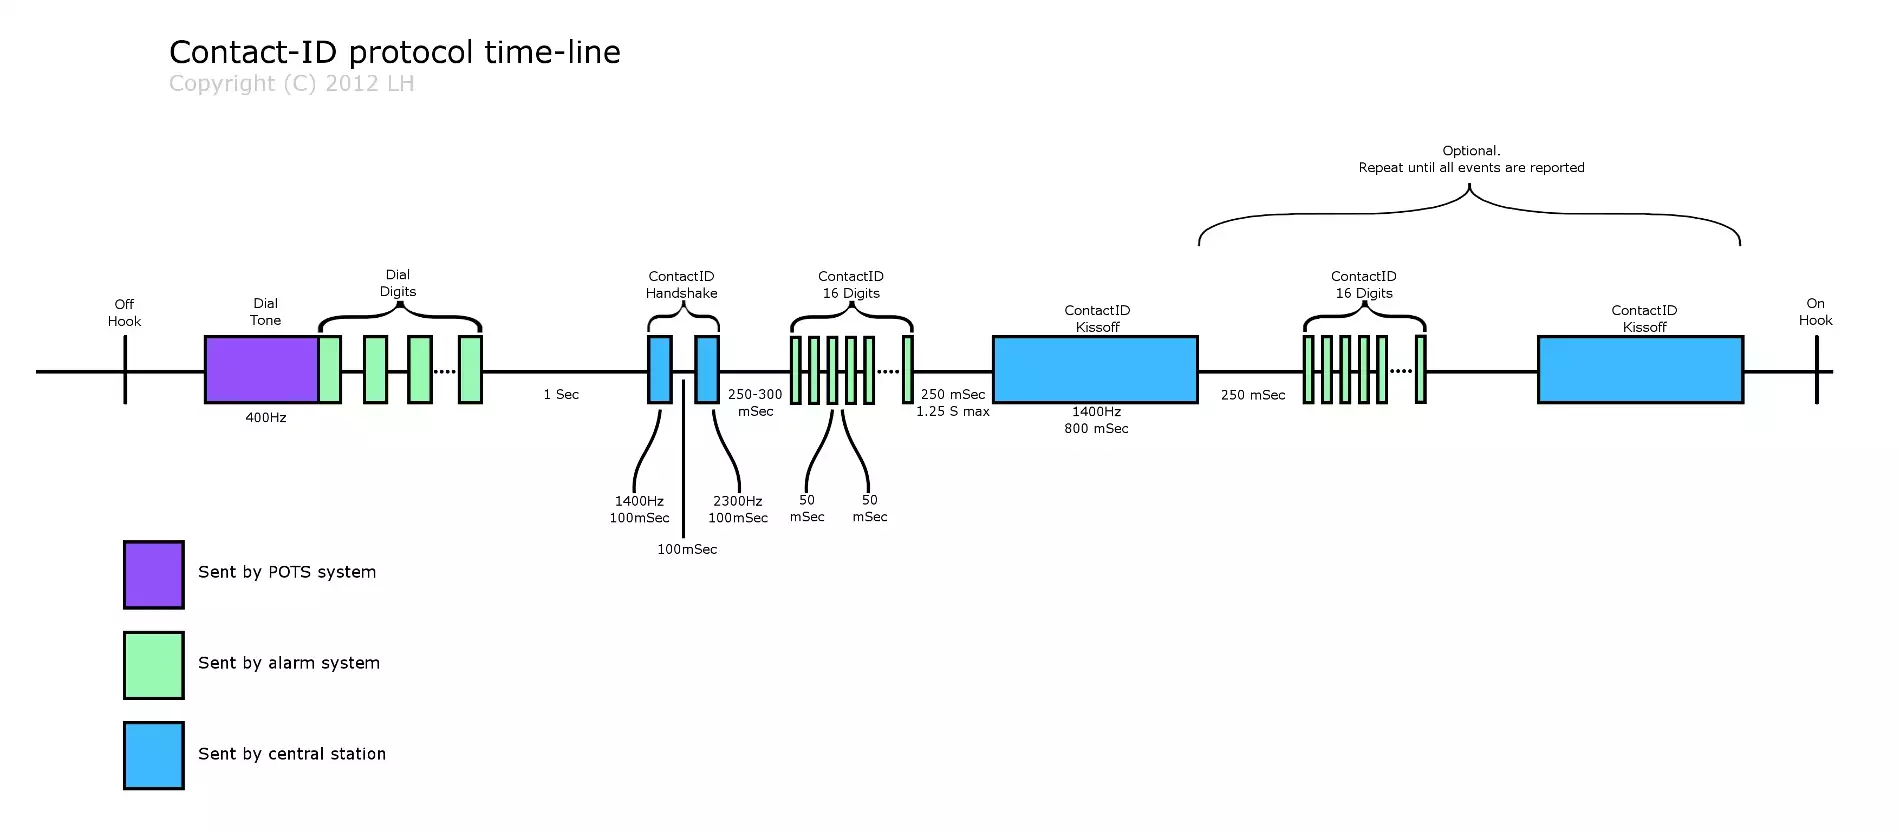
When an alarm event is triggered, the alarm system “picks up the phone” (a.k.a “takes the phone off-hook”), and waits for a dial tone. When a dial tone is received, the alarm dials the number of the central station. Up until now, we’re not dealing with the Contact-ID protocol, but simply with the necessities of using a phone line to communicate. The central station then receives the call, and waits for one second, after which it sends the Contact-ID Handshake. The handshake is made of 100 mSec of 1400Hz pure-tone, then 100 mSec of silence, and then 100 mSec of 2300Hz pure-tone. 250 mSec after that, the alarm sends the Contact-ID message. This message comprises 16 DTMF digits. Each digit is 50 mSec long, and they are separated with 50 mSec silence. The last digit is a check-sum digit that enables the central station to verify the integrity of the received message. After a successful reception of a message, the central station sends a kissoff signal. This is 800 mSec of 1400Hz pure-tone. If the alarm system does not receive the kissoff tone in time, it retransmits the message.
Contact-ID Message
The Contact-ID message contains 16 digits as follows:
- 0-3 – Account number. These four digits identify the specific alarm system or customer to the central station. These digits are not very important in Alarmino’s case, but think about a central station with thousands of customers. When it receives a call from an alarm system, it must be able to tell which one of the thousands customers is calling. These four digits enable this.
- 4-5 – Message Type. Basically this field should always be “18”. Not terribly useful, I know.
- 6 – Event Qualifier.
- 7-9 – Event Code.
- 10-11 – Group/Partition Number.
- 12-14 – Zone Number. Ahh, finely something useful. This is the number of the zone that triggered the alarm.
- 15 – Checksum.
As you can guess, Alarmino is mostly interested in the zone-number and checksum digits. It uses the checksum to verify the received message, and the zone-number to report to the user.
Example for custom contact ID messages
My custom contact ID data is: 1113,18,1,123,03,003
| 1113 | Account number | 4 hex digits Account number as hexadecimal string. Example: ADFF |
| 18 | Message type | This 2- digit sequence is used to identify the Contact ID message to the receiver. It may be transmitted as either 18 (preferred) or 98 (optional). New receiver implementations shall accept either a 18 or a 98. Note that some older receivers may not accept 98. |
| 1 | Event qualifier | Types of alarm events: New Event, New Restore, Status report |
| 123 | Event code | 3 hex digits Event code as hexadecimal string, the type of the alarm (fire, burglar, etc.) |
| 03 | Partition number | Maximum hex 2 digits Group or Partition number as hexadecimal string. Use 0 to indicate that no specific group or partition information applies. |
| 003 | Zone number | Maximum 3 hex digits Zone number as hexadecimal string. Use 0 to indicate that no specific zone or user information applies |
Further information about the Contact ID protocol can be found in the Contact ID protocol alert codes page.
How to send a contact ID message using an HTTP request
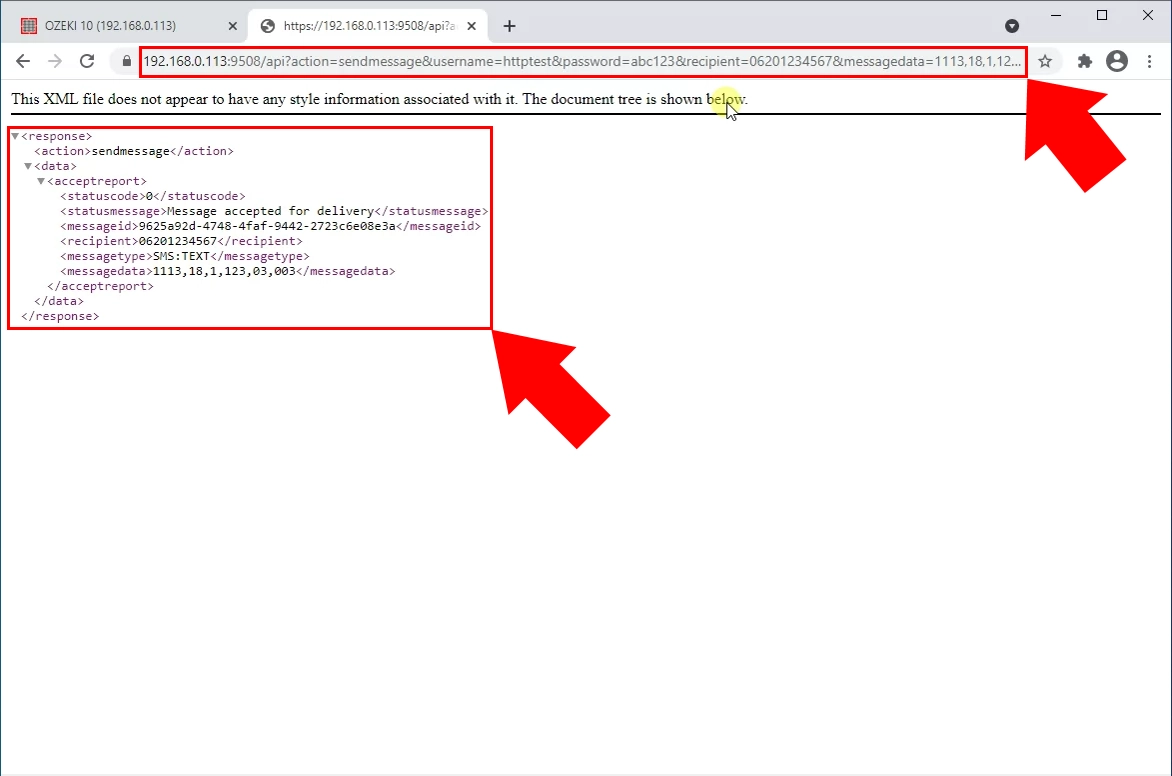
Example HTTP GET requesthttps://192.168.10.5:9510/api?action=sendmessage&username=httptest&password=abc123&recipient=06201234567&messagedata=1113,18,1,123,03,003
<response>
<action>sendmessage</action>
<data>
<acceptreport>
<statuscode>0</statuscode>
<statusmessage>Message accepted for delivery</statusmessage>
<messageid>2613250a-c6ed-42b6-95f9-50990a33cb9a</messageid>
<recipient>06201234567</recipient>
<messagetype>SMS:TEXT</messagetype>
<messagedata>1113,18,1,123,03,003</messagedata>
</acceptreport>
</data>
</response>
2021-03-31 13:58:41.986 INFO httptest: Batch submit of 1 messages
2021-03-31 13:58:41.986 INFO httptest: ->  HTTP request received from 192.168.0.113:61760
2021-03-31 13:58:41.986 INFO httptest: ->  GET /api?action=sendmessage&username=httptest&password=abc123&recipient=06201234567&messagedata=1113,18,1,123,03,003 HTTP/1.1
2021-03-31 13:58:41.986 INFO httptest: ->  sec-ch-ua: "Google Chrome";v="89", "Chromium";v="89", ";Not A Brand";v="99"
2021-03-31 13:58:41.986 INFO httptest: ->  sec-ch-ua-mobile: ?0
2021-03-31 13:58:41.986 INFO httptest: ->  dnt: 1
2021-03-31 13:58:41.986 INFO httptest: ->  upgrade-insecure-requests: 1
2021-03-31 13:58:41.986 INFO httptest: ->  sec-fetch-site: none
2021-03-31 13:58:41.986 INFO httptest: ->  sec-fetch-mode: navigate
2021-03-31 13:58:41.986 INFO httptest: ->  sec-fetch-user: ?1
2021-03-31 13:58:41.986 INFO httptest: ->  sec-fetch-dest: document
2021-03-31 13:58:41.986 INFO httptest: ->  Cache-Control: max-age=0
2021-03-31 13:58:41.986 INFO httptest: ->  Connection: close
2021-03-31 13:58:41.986 INFO httptest: ->  Accept: text/html,application/xhtml+xml,application/xml;q=0.9,image/avif,image/webp,image/apng,*/*;q=0.8,application/signed-exchange;v=b3;q=0.9
2021-03-31 13:58:41.986 INFO httptest: ->  Accept-Encoding: gzip, deflate, br
2021-03-31 13:58:41.986 INFO httptest: ->  Accept-Language: en,hu;q=0.9,hu-HU;q=0.8,en-US;q=0.7
2021-03-31 13:58:41.986 INFO httptest: ->  Host: 192.168.0.113:9508
2021-03-31 13:58:41.986 INFO httptest: ->  If-Modified-Since: Wed, 31 Mar 2021 10:53:21 GMT
2021-03-31 13:58:41.986 INFO httptest: ->  User-Agent: Mozilla/5.0 (Windows NT 10.0; Win64; x64) AppleWebKit/537.36 (KHTML, like Gecko) Chrome/89.0.4389.90 Safari/537.36
2021-03-31 13:58:41.986 INFO httptest: ->
2021-03-31 13:58:41.986 INFO httptest: <-  Returning HTTP response to 192.168.0.113:61760
2021-03-31 13:58:41.986 INFO httptest: <-  HTTP/1.1 200 OK
2021-03-31 13:58:41.986 INFO httptest: <-  User-Agent: OZEKI 10.3.103 (www.myozeki.com)
2021-03-31 13:58:41.986 INFO httptest: <-  Last-Modified: Wed, 31 Mar 2021 10:53:21 GMT
2021-03-31 13:58:41.986 INFO httptest: <-  Server: 10/10.3.103
2021-03-31 13:58:41.986 INFO httptest: <-  Transfer-Encoding: chunked
2021-03-31 13:58:41.986 INFO httptest: <-
2021-03-31 13:58:41.986 INFO httptest: <-  <?xml version="1.0" encoding="UTF-8"?>
2021-03-31 13:58:41.986 INFO httptest: <-  <!DOCTYPE smsapi PUBLIC "-//OZEKI//DTD XML 1.0//EN" "http://www.ozekisms.com/DTD/smsapi.xml">
2021-03-31 13:58:41.986 INFO httptest: <-  <response>
2021-03-31 13:58:41.986 INFO httptest: <-     <action>sendmessage</action>
2021-03-31 13:58:41.986 INFO httptest: <-     <data>
2021-03-31 13:58:41.986 INFO httptest: <-  		<acceptreport>
2021-03-31 13:58:41.986 INFO httptest: <-  			<statuscode>0</statuscode>
2021-03-31 13:58:41.986 INFO httptest: <-  			<statusmessage>Message accepted for delivery</statusmessage>
2021-03-31 13:58:41.986 INFO httptest: <-  			<messageid>d8a429e0-783f-46be-a50e-97a14926b4cc</messageid>
2021-03-31 13:58:41.986 INFO httptest: <-  			<recipient>06201234567</recipient>
2021-03-31 13:58:41.986 INFO httptest: <-  			<messagetype>SMS:TEXT</messagetype>
2021-03-31 13:58:41.986 INFO httptest: <-  			<messagedata>1113,18,1,123,03,003</messagedata>
2021-03-31 13:58:41.986 INFO httptest: <-  		</acceptreport>
2021-03-31 13:58:41.986 INFO httptest: <-     </data>
2021-03-31 13:58:41.986 INFO httptest: <-  </response>
2021-03-31 13:58:41.986 INFO httptest: Sending. Route: route_1,contact_ID_sender_1@localhost httptest -> 06201234567 '1113,18,1,123,03,003' Task ID: f4571a79-df76-4f12-bf4c-38d20dfd2090
2021-03-31 13:58:41.986 INFO httptest: Submit accepted at contact_ID_sender_1@localhost. Submit reference:  httptest -> 06201234567 '1113,18,1,123,03,003' Task ID: f4571a79-df76-4f12-bf4c-38d20dfd2090
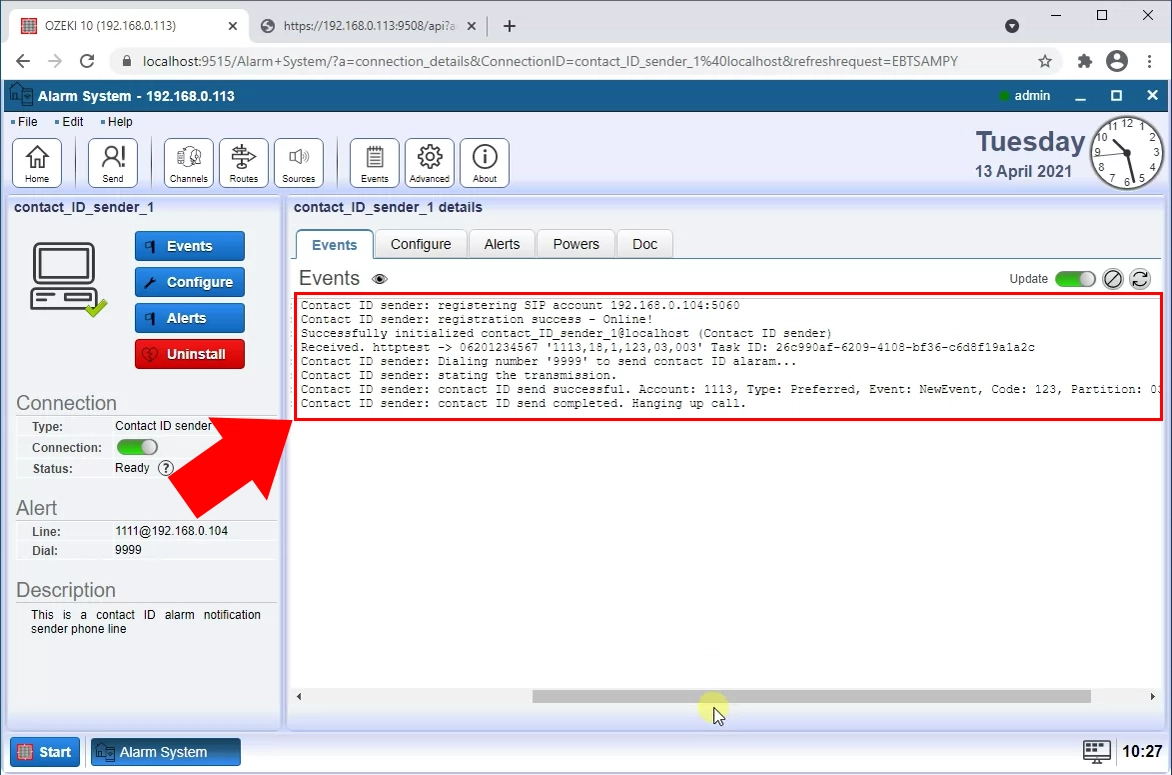
Your Alarm message in the Contact ID sender connection's log
2021-04-13 10:27:09.531 INFO contact_ID_sender_1: Received. httptest -> 06201234567 '1113,18,1,123,03,003' Task ID: 26c990af-6209-4108-bf36-c6d8f19a1a2c
2021-04-13 10:27:09.531 INFO contact_ID_sender_1: Contact ID sender: Dialing number '9999' to send contact ID alaram...
2021-04-13 10:27:10.442 INFO contact_ID_sender_1: Contact ID sender: stating the transmission.
2021-04-13 10:27:14.546 INFO contact_ID_sender_1: Contact ID sender: contact ID send successful. Account: 1113, Type: Preferred, Event: NewEvent, Code: 123, Partition: 03, Zone: 003
2021-04-13 10:27:14.546 INFO contact_ID_sender_1: Contact ID sender: contact ID send completed. Hanging up call.
How to route an HTTP alarm message containg custom Contact ID data (video tutorial)
Add HTTP User source
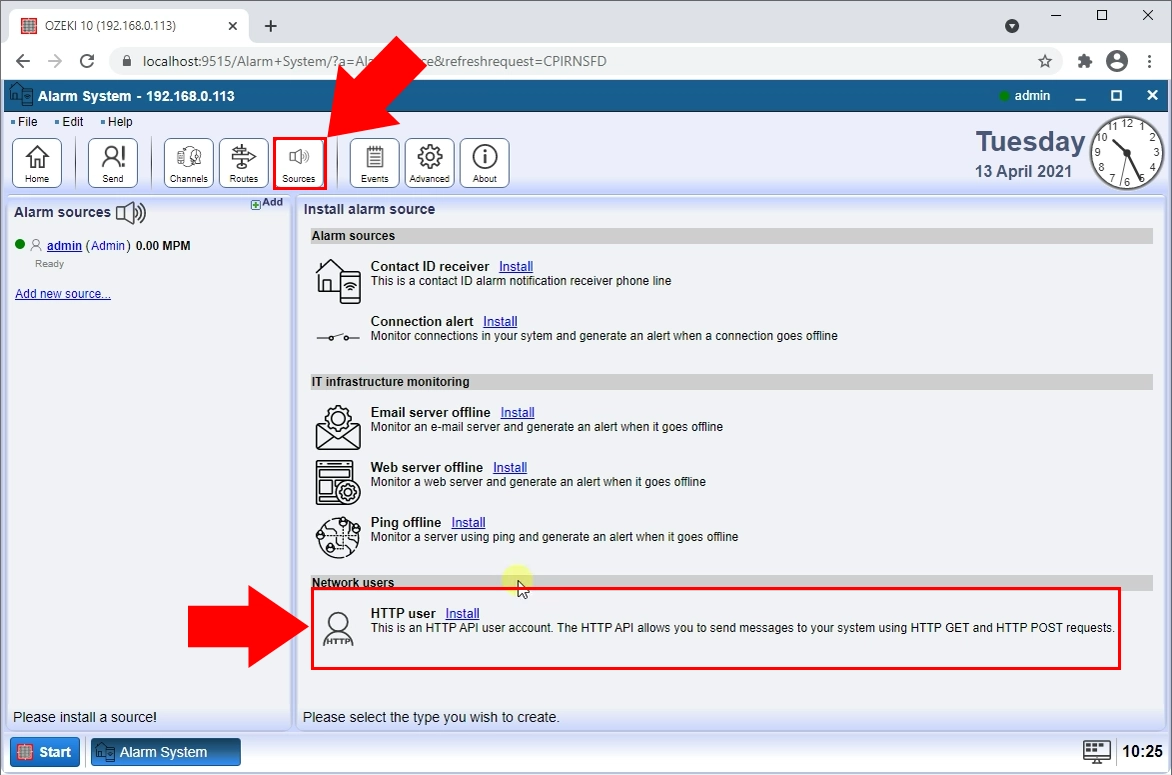
First you need to launch Ozeki Alarm System. Click on Sources in the toolbar on the top (Figure 1). Under 'Network Users', find HTTP user. Click on the blue Install button next to it. This will bring you to a configuration page wehre you can set up your HTTP user.
Configure HTTP User name and password
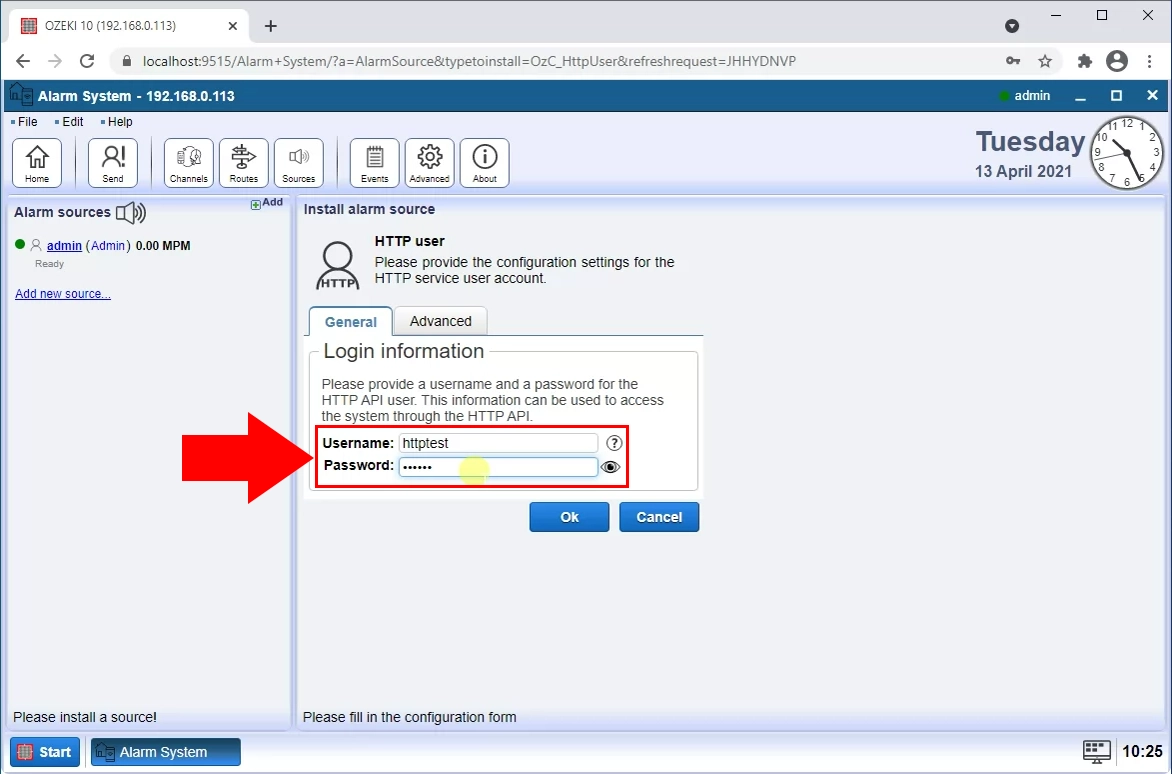
On the first page of the configuration you need to specify your login details (Figure 2). Type your username and password into the respective textboxes. Click OK to finish.
Install Contact ID sender channel
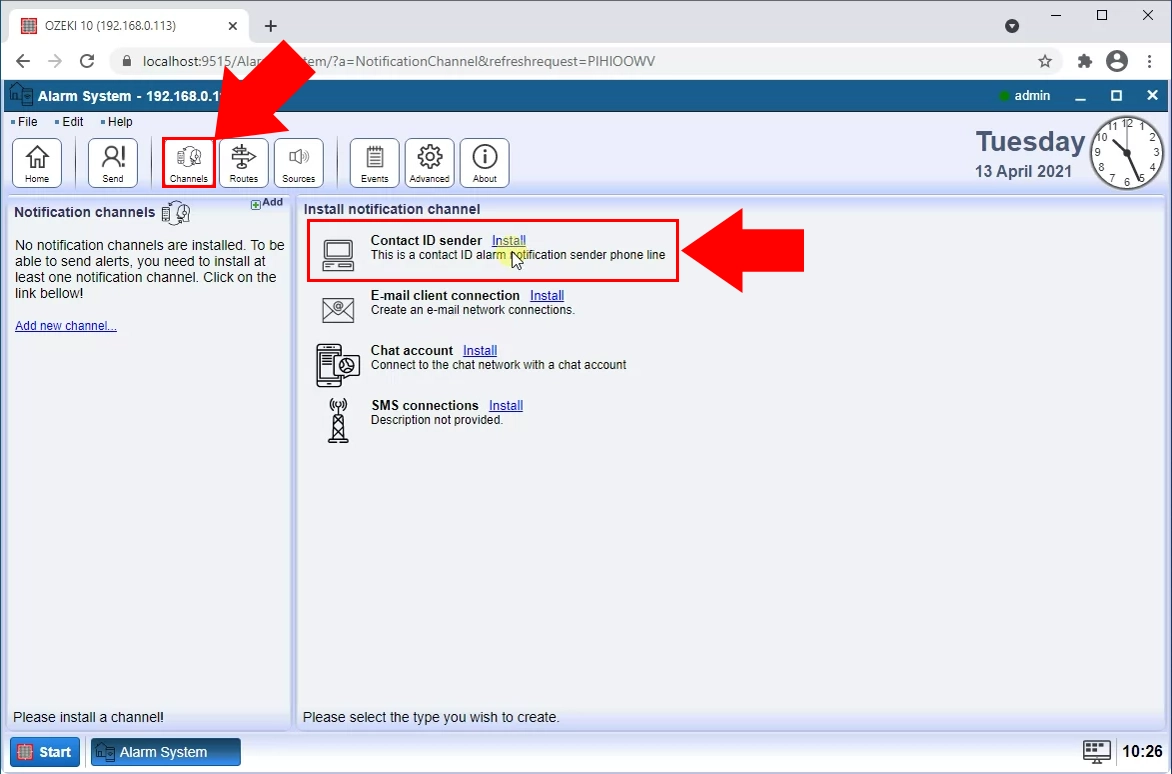
The next step is to install a Contact ID sender channel. Click on the Channels button in the toolbar on the top (Figure 3). Find Contact ID Sender. Click on the blue Install button next to it. This will bring you to configuration page where you can configure an SIP account.
Configure SIP account
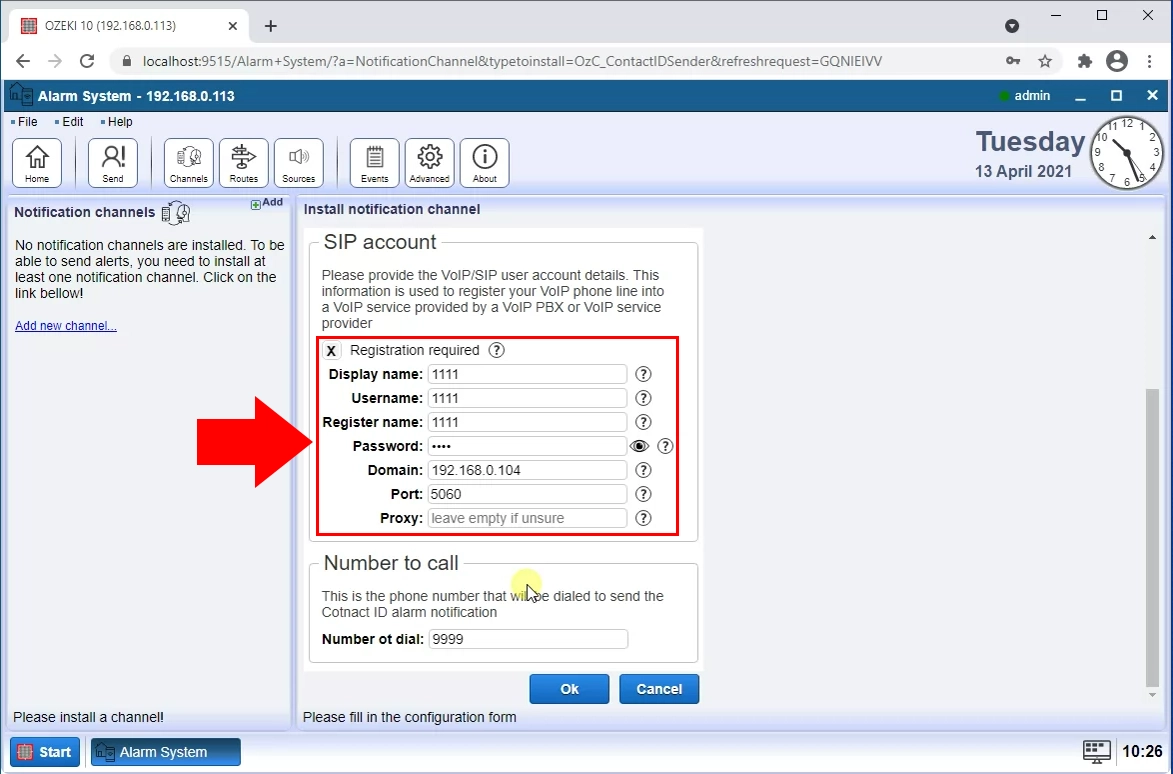
In this page you need to setup your SIP account. Enter these details into their respective textboxes (Figure 4).
- Display name
- Username
- Register name
- Password
- Domain
- Port
Create routing rule
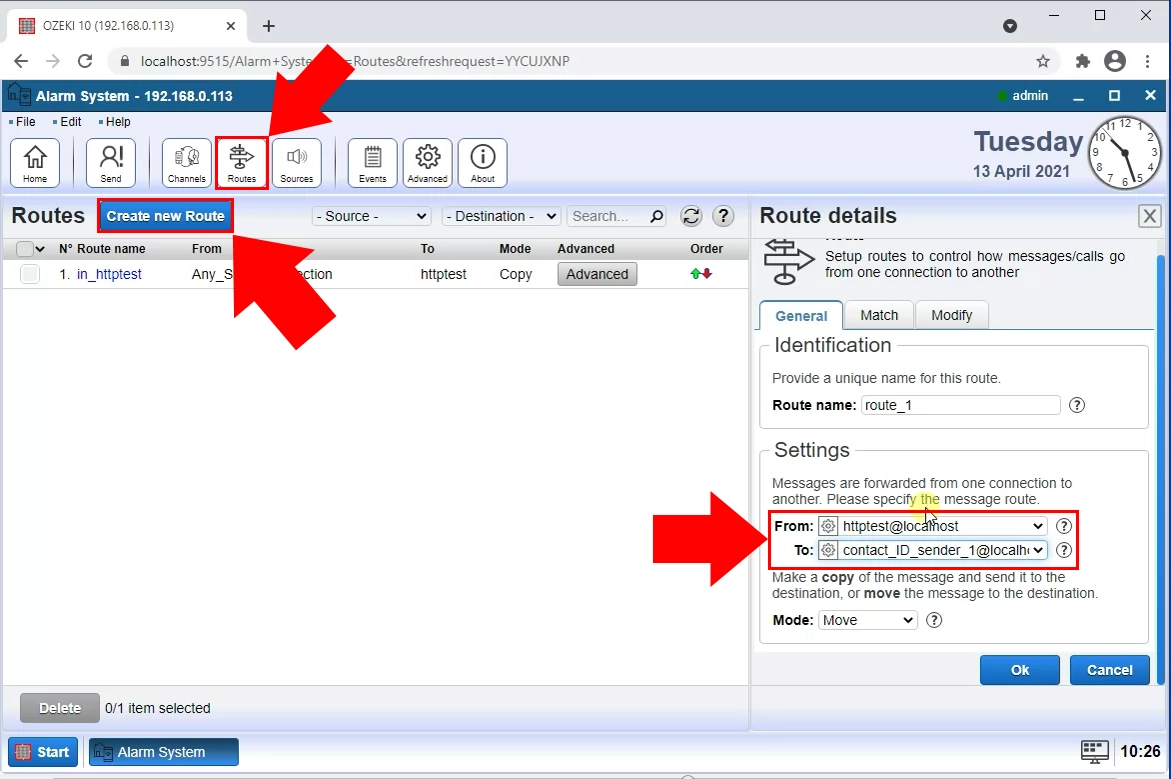
The next step is to create a new routing rule. Click on the Routes button in the toolbar on the top (Figure 5). Click on the blue Create new route button. Now look over to the settings menu on the right. Set From as httptest@localhost. Then set To as Contact_ID_sender_1@localhost. Click OK to save the settings.
Send message in HTTP request
Now send your message in HTTP request. First you need to open a new page in your browser. Paste the adress in Figure 6 into the URL bar of your browser. This will send the message using your browser.
Contact ID message sent
Now switch back to Ozeki Alarm System and the details page of your Contact ID sender. Here you can see in the Events tab, that Contact ID message has been successfully sent.
